As much as we’re fans of finding creative ways to decorate Easter eggs without dye, we have a few die-hard dyers (or dye-hards?) in my family. Specifically my stepfather, who pretty much refuses to add a single sticker, wrapper or otherwise unnatural Easter egg decoration to his pristine, colored eggs. So for him–and all of you–we’ve got a great step-by-step DIY for how to dye Easter eggs naturally, using colors from actual food, courtesy of Chris McLaughlin, the author of A Garden to Dye For now on preorder.
By the way, these colors are also perfect for play dough or watercolor paints. And remember, if you’re going to eat the eggs after, only use safe, edible plants. No nightshade, okay?
(Adapted from Chris’ recipes)
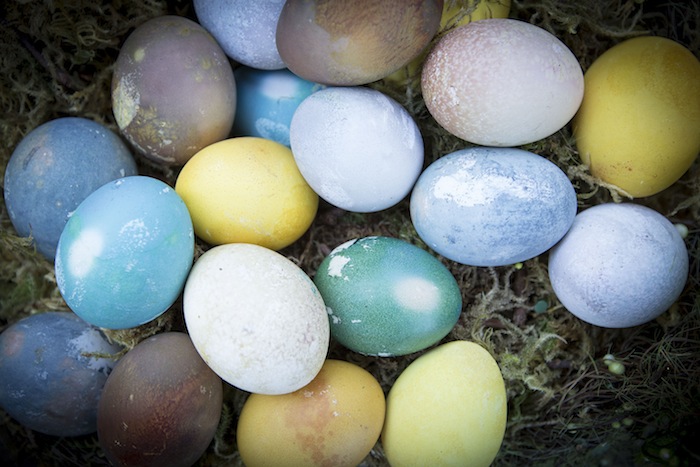
Easter eggs are usually naturally dyed one of two ways. You can use a hot bath, which means that the eggs are colored at the same time they’re being hard-boiled; or they can be dyed in a cold bath. The hot bath works faster, say if you’re creating centerpieces, but the cold process may be easier (and more fun) if you are dyeing with more colors, because you can make a bunch of dyes up in advance. Also, the cold bath yields way more intense colors.
What you’ll need:
-Non-reactive dye pots like glass or stainless steel.
-Water
-Glass jars, bowls or mugs
-A stove and 4-quart pot if you’re using the hot method
-Hard-boiled eggs
-White vinegar
Ingredients For Natural Egg Dyeing:
-Red onion skins (3-4 skins or 1 cup for red or lavender eggs)
-Yellow onion skins (3-4 skins or 1 cup for orange eggs
-Turmeric (1 tbsp per cup of water for yellow eggs)
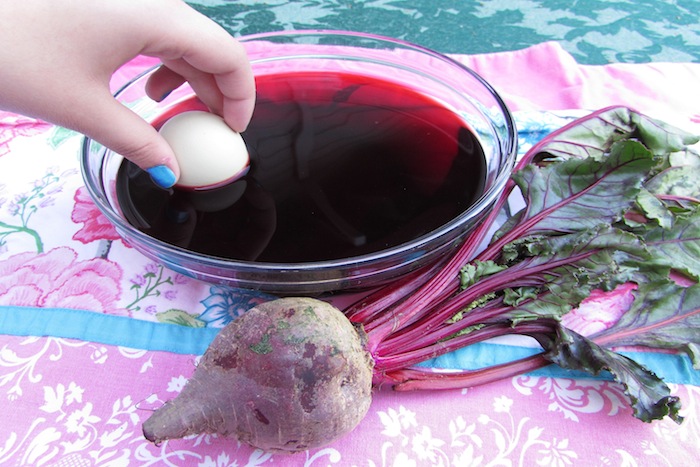
-Beets (1 pound for pink eggs)
-Red cabbage (A quarter-head for blue eggs)
-Fresh or frozen berries, not canned (for various colors, or painting to decorate)
-Anything else you want to experiment with, like grass, paprika, flower petals, or banana peels.
Hot Dye Method
1. Simmer the plants or vegetables in a pan of water for 15 minutes or so, then strain out the plant dyestuff so just the liquid remains in the pot.
2. Add your eggs directly to a – quart (or larger) pot and add enough water to cover the eggs by about 2″ of water.
3. Add 1/8 cup of vinegar, then bring the pot to a boil for 17 – 20 minutes. This method dyes and hard-boils the eggs all at the same time.
Cold Dye Method (definitely more fun for the kids)
1. Make the dyes by simmering ingredients in a pot of water for 20 – 25 minutes. Strain off the dyestuff.
2. Add 1/8 cup of vinegar, and let the liquid cool in jars.
3. Once the dye is cool, add an already hard-boiled egg to each dye color and leave them there for at least an hour – but for the most impressive, vibrant colors, leave them in the dye for up to 10 hours or overnight.
4. Caution: If you let your hard-boiled eggs sit in a dye for longer than 2 hours, they need to be refrigerated during this time for health safety if you plan on eating them.
Thanks to Chris McLaughlin for her tips! You can find her book A Garden to Dye For, which is all about creating natural dyes for all kinds of fabric or craft projects at our affiliate Amazon. It ships in May.