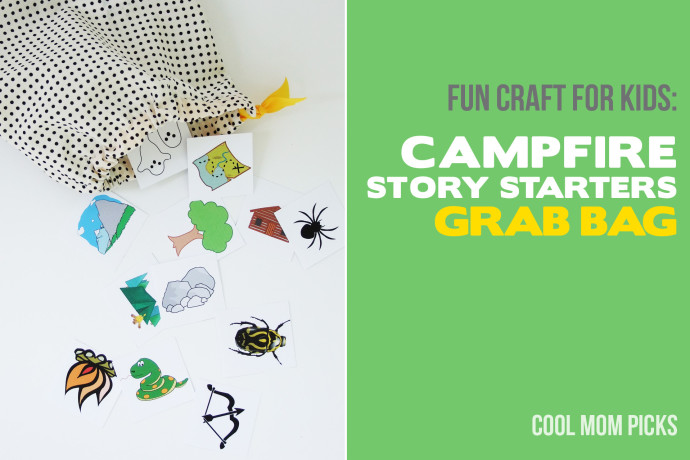
Whether you’re hosting a sleepover in your backyard under the stars, sending the kids off to summer camp, or packing up the camping gear and heading out on a family retreat in the car, make-your-own stories can be a fun, low-tech way to stay entertained. So I came up with the easiest craft idea: A fun story starter grab bag themed around campfire stories, filled with little icons to help generate ideas and make things more fun.
In fact, you don’t even have to be around a campfire to use it. Though marshmallows are always a plus, in any situation.
Materials for Story Starters Grab Bag

Our free printable template, or your own made from clip art around the Web
Printer
Paper
Scissors
Drawstring bag (Either make one or buy one)
How to Make the Story Starters Tiles
1. First download our free template here and print it out on a 8 1/2 x 11 sheet of paper. We went with campfire story themed images but you can do anything you want!
2. Cut out the pictures following our lines. Before you cut them out, consider taking a trip to your local office supply store and having them laminated. It only costs a couple of dollars, and it will make the cards last a lot longer than the trip. Or just print on heavier card stock and hope it doesn’t rain.

Materials for Drawstring Grab Bag (Optional)
Fabric measuring 10 inches x 18 inches
Fabric scissors
Sewing pins
Sewing machine
Thread
Ribbon
How to Make a Simple Drawstring Bag

1. Cut your fabric so it measures 10″ x 18″
2. Cut 15″ of ribbon for the drawstring tie.

3. Place the fabric horizontally on a table and fold down the top 1.5″. Pin it down.

4. Sew a 1/4 inch seam. This will create a channel where you thread your ribbon drawstring.
5. Fold the fabric in half lengthwise, right sides together.
6. Sew around the bottom and side of the bag using a 1/4″ seam allowance. Make sure you do not sew over the channel you created in step 3! Also, don’t sew the fourth side, which will be the opening to the bag. (Bags, kind of need openings, right?)

7. Turn the bag to the right side and thread the ribbon through the tunnel you created in step 3. Tip: I like to use a safety pin on one end to help cinch it through. Then knot the two ends of the ribbon together so they don’t slip back into the tunnel.

8. Now you’re ready to place the printed tiles in the bag. Done!
Alternatively, you could skip all of these steps and buy a simple drawstring bag like this one from Mad Mary Creations on Etsy for just $2; decorate it with markers, iron-ons, felt, stamps, glitter, you name it.
How to Use Your Story Starters. (The Fun Stuff!)

Now you’re ready to go! Any rules at all apply. Here are a few ideas:
-You can pass the bag in a circle, and whomever has it draws one tile and has to tell a story incorporating that image.
-Let each person in the circle draw a tile. Go around the circle and tell a story one sentence at a time, but you have to include the item you’ve drawn.
-Have the story teller draw three to five random tiles, and tell a story using all of them. Should get interesting!
-To make things more fun, include the names of people around the campfire, cartoon characters, and random items in the grab bag. You could end up with an awesome story about Grandma saving Batman from a fire-breathing kitten.
For more fun craft ideas and DIY project, visit our archives