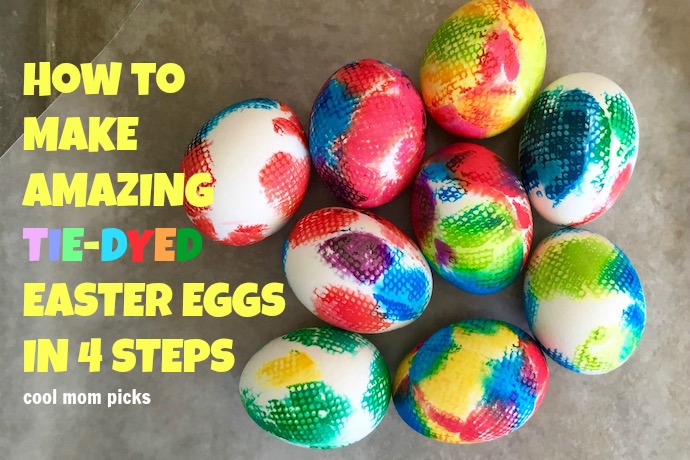
Tie-dye Easter eggs? Oh, heck yeah! Didn’t you know? We’re parenting in the Pinterest era, which means now Easter egg dyeing ideas are so much more than plain pastels or primary colors. We’re seeing amazing pop-culture characters, foil-wrapped eggs, and elaborate decoupage. And we’re very inspired. But if advanced egg decorating is not in your wheelhouse, that’s why we love these tie-dye Easter eggs, that let you get super creative without a whole lot of work.
I know, tie-dye Easter eggs sounded overwhelming to me too, at first, but they’re actually really simple and you probably already have all the supplies you need right in your kitchen. I did this on a whim with my daughter and niece in about 30 minutes, and the eggs turned out better than I could have imagined.
So much so, that I’m pretty sure tie-dye Easter eggs will be a new family tradition each year!
Related: An expert chart for dyeing Easter eggs with food coloring to get just the right shade.


The supplies
Chances are, you won’t even have to run to the supermarket for the supplies you need to do this craft. (I didn’t.) You’ll need:
– a spray bottle with water and vinegar
– plastic wrap
– paper towels
– food coloring
– hardboiled eggs
– rubber bands or twist ties (optional)
Step 1: Prep your paper towels

The first step is to set a piece of plastic wrap and 2–3 sheets of paper towel at each kid’s workspace. The plastic wrap is to keep your table clean, and also to keep the color from bleeding when you wrap the eggs (more on this later). For the paper towels, we used the plush kind with thick embossing, which made for a pretty pattern on the eggs.
Mix 2/3 parts water and 1/3 part vinegar in a spray bottle and let the kids soak the paper towels. The vinegar water allows the colors to spread and stick to your eggs, so don’t be shy with how much you use. It shouldn’t look like you dipped it in a bucket of water, but it should be nice and damp.
Step 2: Add food coloring


Use the food coloring to create an interesting pattern on the paper towels. Use as many colors as you want — I think some of our prettiest ones had 4–5 colors — but avoid a big mishmash of color all in the middle of the paper towel or it will end up just looking muddy. My kids started to get really creative with their designs — with everything from mandala-looking patterns to an American flag (so Easter-y, right?).
Step 3: Wrap the egg


Once you have the food coloring the way you like it, set the egg in the middle of the towel so that it’s standing on its end. Lift up the edges of the towel (and the plastic wrap, that’s important!) so that the egg is completely wrapped in the towel, and twist the top tightly. If you have a twist-tie or rubber band, tie it off. We didn’t, and ours were fine without them (thanks to the plastic wrap).
Step 4: Wait . . . then unwrap

This is where your kids get to practice delayed gratification, because the longer you let the eggs sit in the towels, the brighter and bolder the colors will be. We waited about an hour and the colors were really vibrant. (Something to keep in mind if you plan to eat the eggs: Don’t let your eggs stay at room temperature for more than two hours.)
The food coloring will still be wet when you unwrap the eggs, so if you’re not careful you’ll smudge the colors. But a slight smudging gives it that authentic tie-dye look, so don’t sweat it too much.
Once the eggs are unwrapped, it will take about 10 minutes to air dry. Keep them in the fridge for up to a week.


Seriously easy and really so pretty. Easter, I got this.
All photos © Kate Etue for Cool Mom Picks.