If you’ve ever wanted to create an organized craft space for kids, whether it’s a whole room or just a small area where they can get their creative on, well we’ve got some fabulous tips for you. After all, I think that as parents, we’re all praying we don’t have an Olivia on our hands who thinks it’s a brilliant idea to Jackson Pollock our dining room walls — we want the artist, not the mess, am I right?
Enter Megan Schiller of The Art Pantry, an ace at creating kid-friendly craft spaces for homes and schools. She’s also the author of a series of super helpful e-guides about craft spaces, art prompts and creativity. So we’re grateful she’s offered Cool Mom Picks readers a step-by-step guide to creating an organized crafts space for kids that we hope you’ll come to love as much as they do.
Related: The best arts and crafts storage solutions – Reader Q&A

Here, Megan’s 7 tips for getting your at-home art studio or craft space in order:
1. Design matters
Did you know that design has the ability to affect our mood and productivity? How do you feel when you are cooking in a messy kitchen, or working at a cluttered desk? Is it enjoyable, or does it stress you out? What if every time you made dinner, you had to dig through a huge box of cooking tools just to find a spatula?
This same idea applies to kids’ craft spaces. When you create a craft space that is easily accessible, organized, and aesthetically pleasing, your child will feel at ease and ready to get to work.
2. Make your kid’s crafts easily accessible
You can help your kids gain creative independence, even at a very young age, by having some familiar materials always accessible. When children see art supplies out in the open, it reminds them of their presence, and you’ll probably notice those crayons or craft punches or stencils getting used more often. It will allow for spontaneous art, which is important; if your kids have to ask for assistance or permission every time they want to make something, it stifles creativity.
Make sure to go over the rules with your kids and let them know you trust them. (Even if you’re not so sure!) Maybe they will surprise you as they gain a sense of autonomy and responsibility, even when it comes to putting things away.


3. Invest in the right containers and ditch the packaging
When you add up the cost of shelf organizers, bins, and art caddies, it can be expensive. But when you see how much of a difference it makes, you may find it’s worth the investment. Make sure you find containers that fit your space, and have those that help you keep your supplies organized into different categories.
Also, when filling your containers with supplies, make sure to take it all out of the packaging to make them even more inviting and accessible, and eliminate clutter.


Related: Decluttering tips from 5 top organization experts: Which is best for you?
4. Keep the craft space simple and uncluttered
Kids can get overwhelmed by too many choices and I’ve found that kids are more likely to use their craft materials when they are uncluttered and easy to see. So don’t try to cram all of your supplies into a single craft space just because you have them.
This doesn’t mean you have to get rid of anything; just choose some of the materials for immediate use, and store the rest in a labeled box or bin (depending how many you have) in the closet. When you want to rejuvenate your space, as with games and toys, it’s easy to rotate some new things in and a few others out. Kids will be inspired by the changes, and less stuff in your craft space also means less to clean up!

5. Craft spaces aren’t just for art
Don’t feel limited to art supplies for your kid’s craft space. Think of it more as a workshop, where your kids can use their art materials to enhance other types of “work” as well. You can include some toy cars, little plastic animals, play kitchen tools, or even blocks. This way, art-making becomes woven into kids’ imaginative play, which can keep them engaged for long periods of time.
For example, we sometimes keep little dolls in our craft space and I find my girls are inspired by them, and end up using our art supplies to make homes or accessories for them.
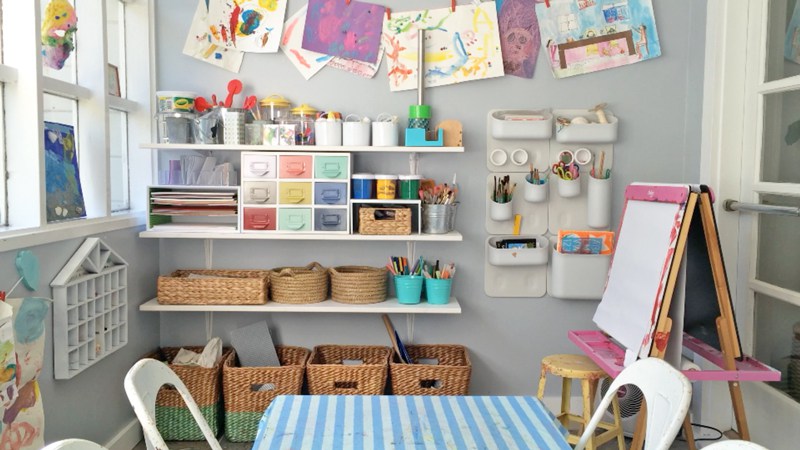
6. Include a place to display finished work
When setting up your craft space, don’t forget to include areas for storing and displaying your child’s art. (Your kids certainly won’t let you forget!) If you have a little extra space, you can include a small drying rack or shelf — I use a small shoe rack for drying art — and have a basket or tray for storing finished art when dry. When it fills up, we go through the artwork together and save our favorites.
One of my favorite ways to display art is to hang a strand of twine on the wall and use clothespins to clip the art to the twine. You can also dedicate a bulletin board to your kids’ art or create a gallery wall with frames.
Displaying children’s art shows them that their work is valued and helps build confidence. It also acts as a reminder of how they are growing and learning new skills.

7. Keep things fresh and exciting with art prompts
Sometimes kids get comfortable using the same few materials and are reluctant to branch out of their comfort zone. If you notice your kids are always reaching for the markers, try setting up art prompts to shake things up. To do this, simply choose a few neglected materials from their craft space and put them on the table alongside their go-to materials. If your kids love markers, try setting out the markers alongside Washi tape and stickers. Display them in a thoughtful, inviting way and see what happens the next time your kids come to the art table.
Choose a few new materials to set out each day for a week and I bet you’ll see a difference in the way your kids engage with their supplies.
Thanks so much to Megan Schiller from The Art Pantry for her fantastic tips! You can get more expert organization tips and see awe-inspiring before-and-after photos of kids’ craft spaces at her website.
You can also order The Art Pantry e-guides for instant download, including The New Playground, and Invitations to Create: 30 Days of Easy Art Prompts.


I love this! We’re constantly updating our craft room. Is there going to be a place where I can see where all the items in the pictures can be purchased? I especially would love those white cups with the markers, paint brushes, and scissors that attach to the wall.
Hi Kristina, thank you for your question. We reached out to Megan of The Art Pantry and she let us know that the white magnetic wall cups are by Urbio. There are also a ton of resources in her e-guides. If you have other specific questions about products, please let us know. Good luck! Allison
Thank you so much, Allison!
How to have an organized craft space for kids: Step 1. Have money, step 2. spend it. lol
Or, do what I do…
1. Use these ideas for inspiration
2. Make it work for your budget, like keeping supplies separated marked shoeboxes. No need to buy everything new to get organized, right?
Totally agree, Liz. There are plenty of free or low-cost containers for organizing supplies. Re-used items from around the house are great. Second-hand thrift stores also have a ton of options.
Thanks Megan! I love your ideas so much!
Thanks for the inspiration! Where did you find those baskets with the white canvas on the bottom??
Those baskets are from The Container Store. The white on the bottom is actually the same woven material as the top, but colored white.
These are great ideas. I can never seem to keep my craft room organized! I’m usually so busy creating that I don’t take the time to clean properly, but I think some of the advice might help. Thanks!